Blog
How to save time by weeding out problems early on in ship hydrodynamics models

Bindweed has white flowers that look like the trumpets of angels, but the sight of them strikes fear into the heart of any experienced gardener. The reason for this is that Bindweed is hyperinvasive: it grows incredibly quickly and spreads like crazy. Usually, you can keep it under control if you can get to it in the early stages before it’s all over the place. But once they’ve spread, unravelling them is a challenge because of the way they send tangling tendrils over and through everything. You are in big trouble if you don’t stay on top of it and weed them out early on.
The garden isn’t the only place where you are in for big trouble if you don’t weed out problems early on. In the world of floating system hydrodynamics, seemingly minor issues can lead to headaches down the road. The challenge with hydrodynamic models of ships is that they are built up with many inputs and used in stages. When there’s an error, it can lead to a tangled mess when you get confusing results. Likewise, unravelling the problem to figure out what’s gone wrong is a challenge because there are model details to review spread out all over the place. On the other hand, you can keep errors under control by making some quick checks in the early stages. In this article, we’re going to cover a few simple ways to check ship hydrodynamics data early and often. Checking results as you go and making sure all the inputs and reference frames are lining up the way you want is crucial. But it doesn’t have to be complicated. With a few simple steps, you can single out major problems in your hydrodynamics model. What we’re going to cover is:
- calm water static test
- calm water dynamic decay test
- low frequency wave motion test
First, we’re going to cover the calm water static test.
The first step is to check how the floating system sits in completely calm conditions
The idea is to check how the floating system sits in the water without anything else going on. There are no environmental conditions from wind, current, or waves to cause a disturbance and certainly no propulsion, either. The first thing you want to take a look at is how the hydrostatics of the system resolve the floating position. This can be a static or a dynamic simulation, but either way, you want to check and make sure the system is resolving a stable and expected position in the water subject to its own weight. Does the floating hull match the expected trim and draft?
If you are importing hydrodynamic data from another program, reference frame alignment alone could cause the system to tilt significantly or even flip upside down. The static orientation of the system is the first quick check that the system is set up correctly. However, this won’t tell you anything about the rudimentary dynamics of the system. This brings us to the second point on the calm water dynamic decay test.
The calm water decay test checks the dynamic response in the most basic way
The next step is very similar to the calm water static test, though with one tiny increment of complexity. Like before, it’s in calm conditions with no environmental effects. The decay test starts a dynamic analysis with some small initial deflection in one degree of freedom. The degrees of freedom to focus on are the ones with hydrostatic restoring forces. For most floating systems like ships, this will be heave, roll, and pitch. The resulting dynamic simulation will show a decaying vibration response that will reveal the natural period of vibration.
Often, it’s possible to make a rough estimate of the natural period based on the physical inertia of the system and restoring stiffness. But as the systems increase in complexity, this can be a challenge to figure out. Nevertheless, initial stages of hydrodynamic analysis provide feedback on the expected natural periods in key degrees of freedom like roll and heave, and you can gauge whether the dynamic response of the model is matching up to expectations. If the decay period is significantly off, or if other strange effects like excitation in other degrees of freedom are happening, it might mean there is reference frame misalignment or missing hydrodynamic information in your numerical model setup. A dynamic decay response is the first step in checking that the model is set up correctly. However, what’s missing is some indication of what the system will do when there are actual environmental conditions. This takes us to the third and final point, checking a low frequency wave motion test.
The low frequency wave motion confirms the dynamic response in ocean wave conditions
The goal is to make sure you’re getting a sensible and expected result from the hydrodynamic model in some kind of environmental condition. But how can you know what’s sensible motion for any type of floating system? It’s true, the resulting motion can get very complex across a wide range of ocean wave frequencies depending on the nature of the hull. The key is to focus on low frequency response.
All floating systems will follow the ocean wave in the limit of these low frequencies. In other words, the heave response will match the wave height, and the pitch and roll response will match the wave slope. In hydrodynamic terms, all motion RAOs converge to a magnitude of 1 in the lowest frequency limit. This gives you a way to check the resulting floating system motion matches expectations when there is some kind of dynamic condition present. How low is low frequency? It depends on the floating system, but for most monohulls this might be 0.2 rad/s or 30 second wave periods.
While the low frequency limit gives us a specific target to look for – namely the floating system follows the water surface and slope – it’s also well worth doing a few spot checks at nominal wave frequencies you expect to encounter. This can reveal qualitatively unrealistic motion that might give you a hint something is wrong with the model set up, too.
But will floating system motion always converge to follow the ocean wave surface?
Another way to think of this is what happens in a tidal elevation change. Tides are waves just like any other, but with an exceptionally long period. If your floating system passed the calm water static test, it should follow the water surface in the lowest possible wave frequency.
Let’s look at an example.
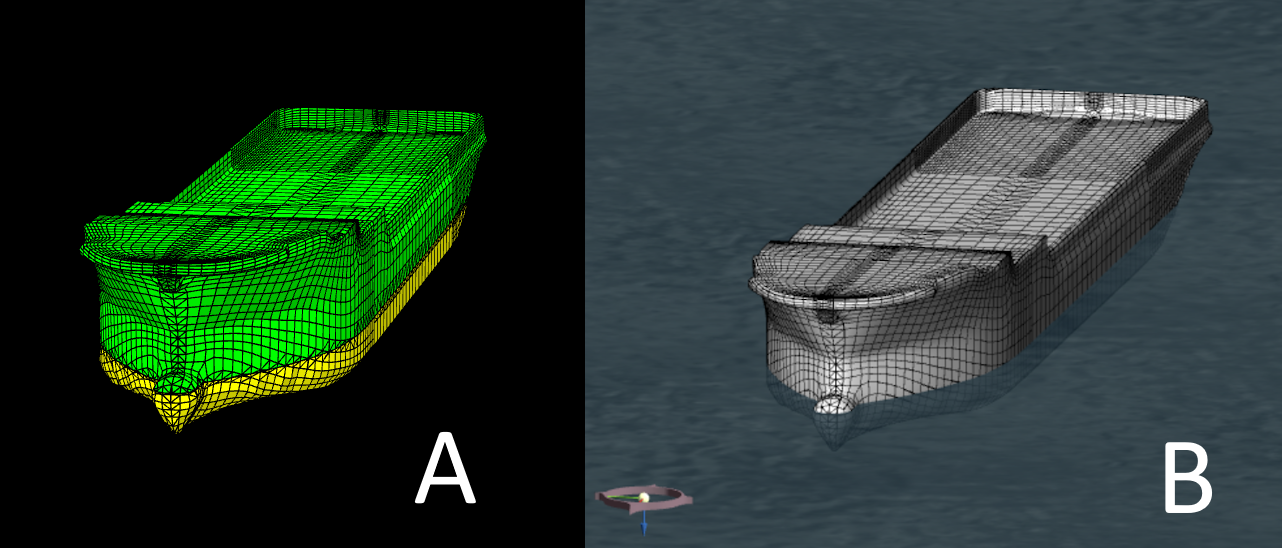
We will use the Generic Offshore Supply Vessel to show how to go through some of these checks. This scenario shows the Generic Offshore Supply Vessel configured in ProteusDS Simulation Toolbox, with a hydrodynamic database imported from the ShipMo3D. A static calm water decay test isn’t really needed within the ShipMo3D toolset as the hull and displacement configurations are actually inputs to the software. Still, we can use it as a reference to help make sure the hydrodynamic data is used correctly in ProteusDS Simulation Toolbox. In the scenario below, a dynamic simulation shows the Generic Offshore Supply Vessel sitting static and at the right waterline position and trim as indicated in the ShipMo3D toolset.
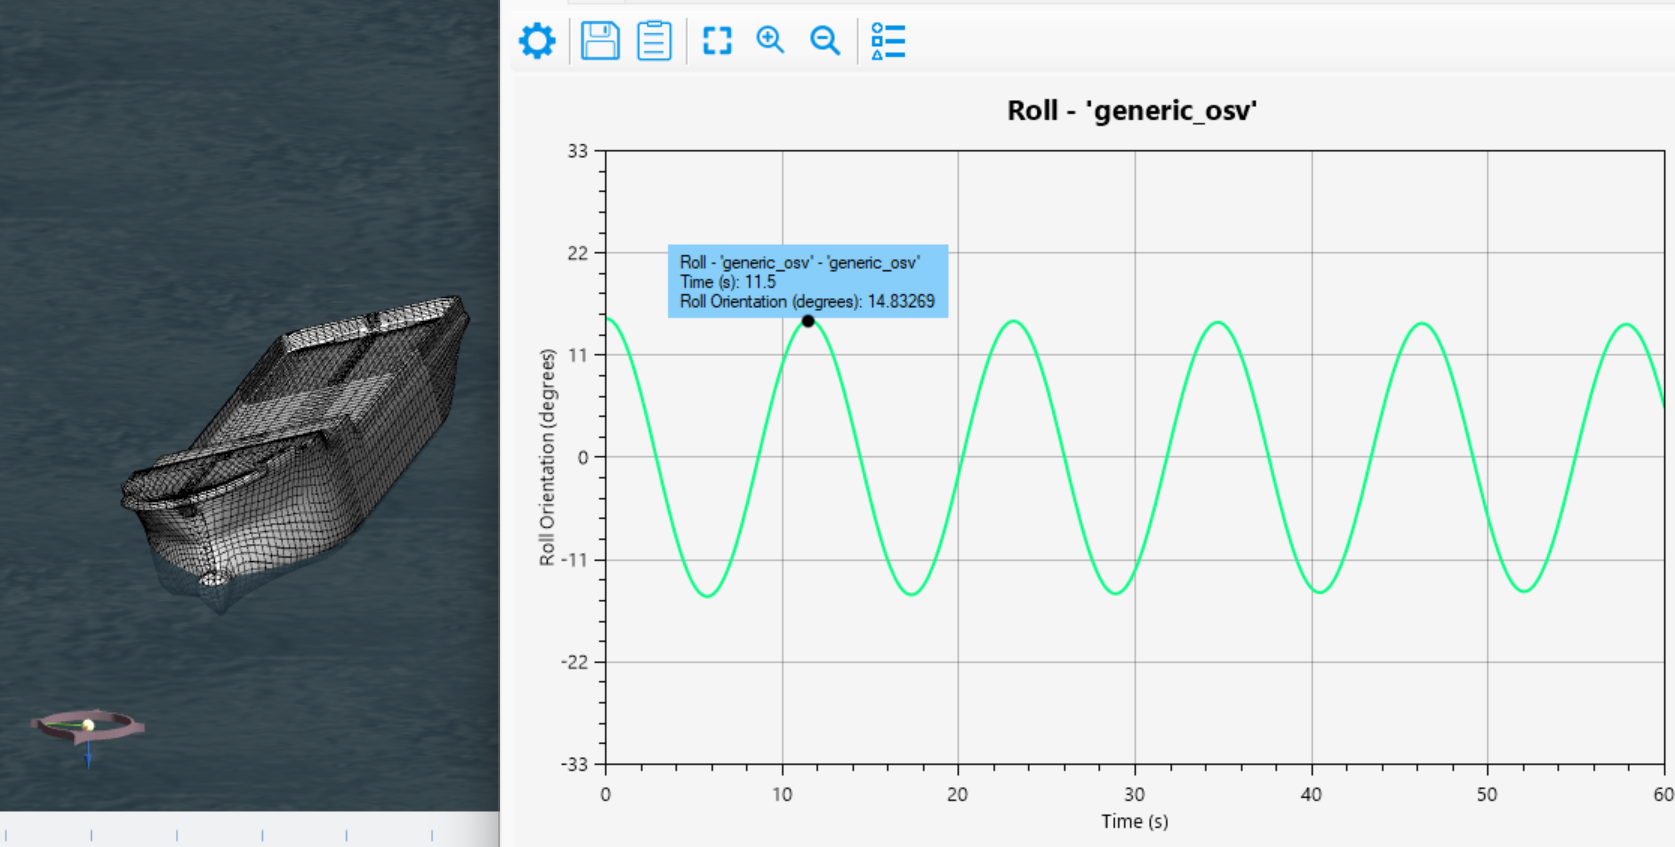
Next is a decay test. In ProteusDS Simulation Toolbox, setting up different scenarios with a small heave, pitch, or roll will give an idea of what’s expected. To be more thorough, the roll natural period is indicated by the ShipMo3D toolset as 11.8 seconds, which we can check. Using an arbitrary roll angle to start shows the roll period very close at 11.5 seconds. It’s worth checking other decay tests like pitch and heave as well to check for any unnatural looking motion.
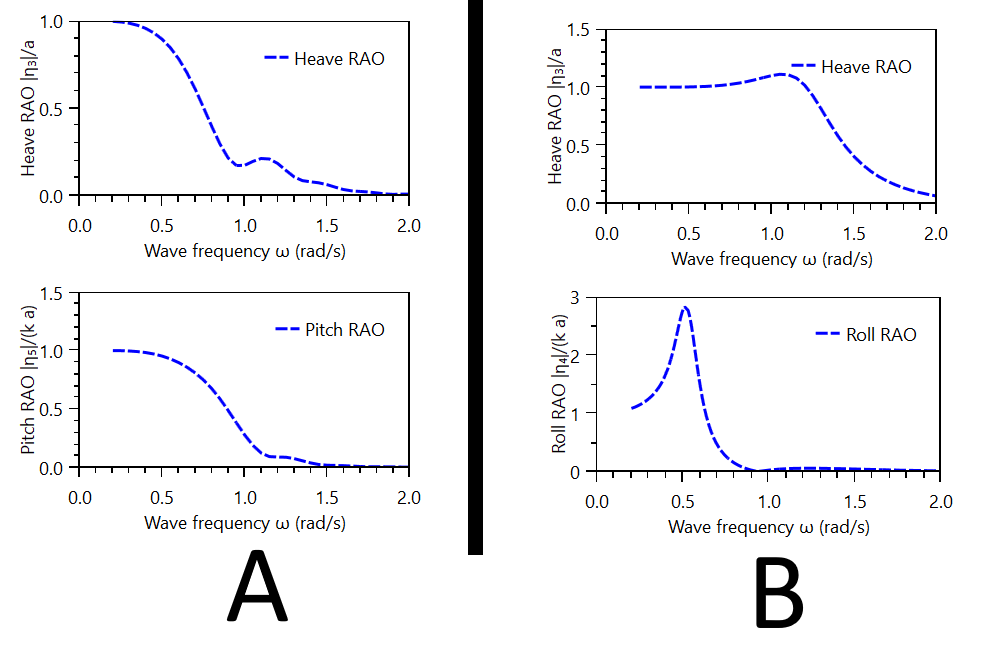
Finally, the low frequency, or high period wave motion test. First, note that you can quickly check this in the ProteusDS ShipMo3D toolset directly. This can be checked in the ShipMo3D toolset application SeakeepRegular. The heave, pitch, and roll motion RAO plots at zero speed can be seen in the figure below. In head sea conditions, the heave and pitch motion RAOs converge to 1. And in beam seas, both heave and roll motion RAOs converge to 1. Note that the ProteusDS ShipMo3D toolset normalizes rotational (roll, pitch, yaw) motion RAOs by wave slope, and not all seakeeping analysis tools use this approach. Rotational motion RAOs will only converge to a value of 1 when normalized by wave slope – otherwise they will converge but not necessarily to a value of 1.
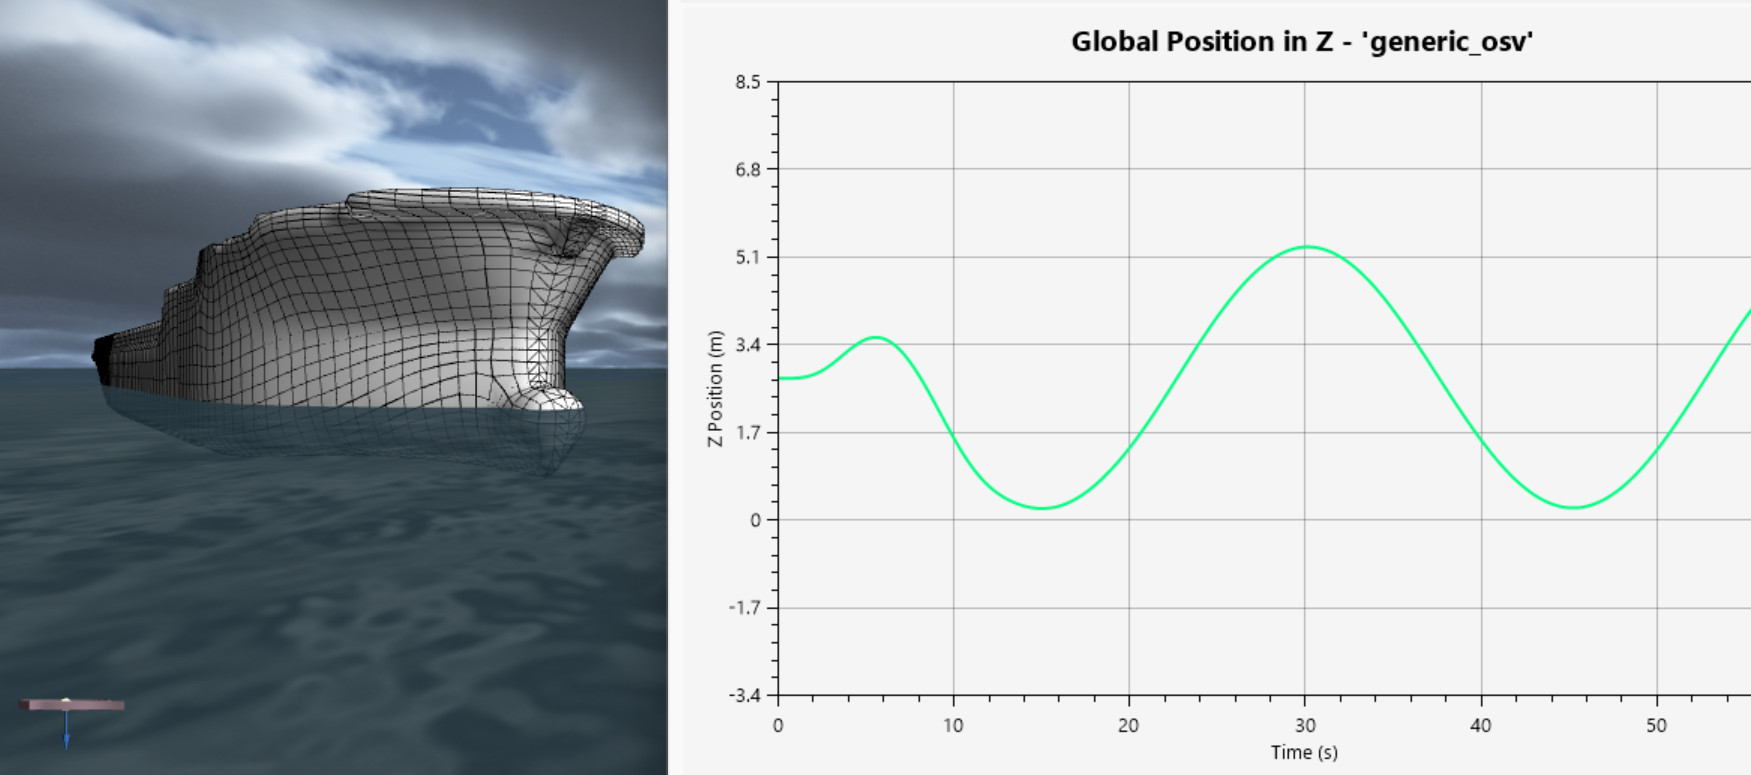
So how do we check this in a transient time domain analysis tool like ProteusDS Simulation Toolbox? One way to do this is to set up a scenario with a single Airy wave with a very long period, perhaps 5m, 30 seconds. You can see the heave motion resulting from a head wave condition in the figure below. The heave motion follows the wave height expected, and visually the vessel does well to follow sea surface elevation and pitch follows the wave slope.
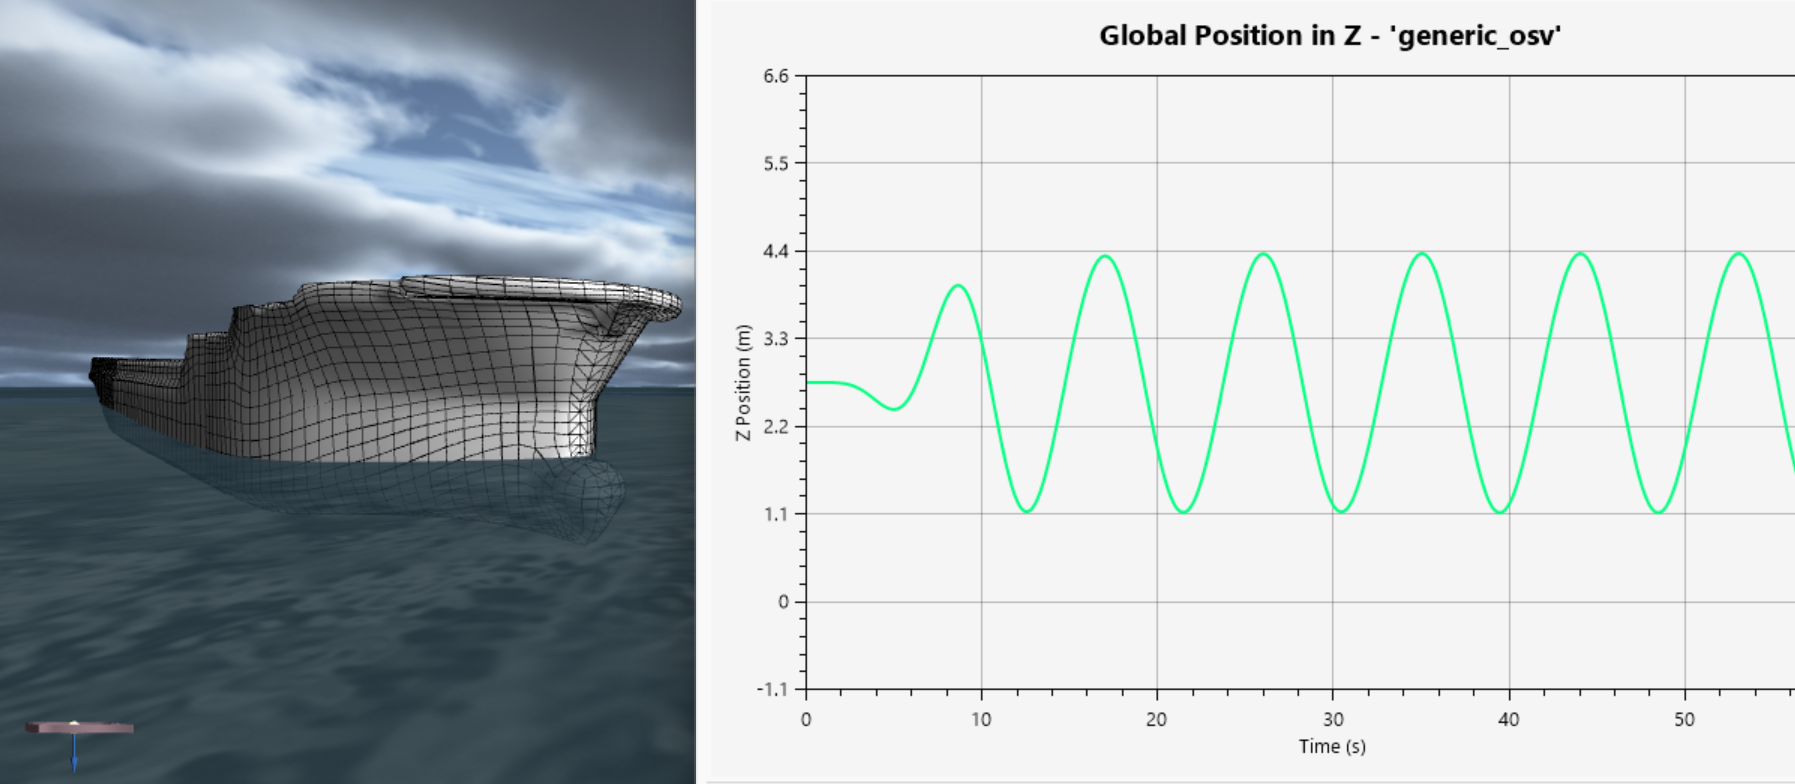
It’s also worth checking a wave period closer to what might be expected just for a qualitative visual check on motions, even if we don’t have an expected value to compare with. In the next picture, you can see heave motion in a 2m, 8s wave in head sea condition. This is a lot faster of a wave, and with the size and mass of the vessel, it should have both some lag from the wave and also as it isn’t expected to be at the resonance condition, it should have a somewhat lower motion than the wave height itself. You can see the bulbous bow bobbing in and out of the water, which just shows the phase difference, and also heave motion is a fair bit less than the wave height. Qualitatively, the motion looks plausible as well.
It’s time to summarize
There are a lot of inputs in hydrodynamic tools and it pays to find a way to quickly check that it is set up and you’re using the hydrodynamic data correctly. The first step is to check what happens in static conditions with no environmental loads – does it match expected trim and displacement? The next is a calm water decay test. Does it look like the natural periods in heave, pitch, and roll are lining up? Finally, a system test in very low frequency waves helps ensure the resulting motions are working as expected. In the lowest wave frequency, heave motion follows the wave height, and pitch and roll will follow the slope of the wave.
These simple steps are good ways to catch errors and keep them under control. These checks help you keep on top of problems before they spread and get out of control – just like when managing hyper invasive plants like Bindweed.
Next Step
Check out this video tutorial that takes you step by step through the process of checking load RAO data when used in ProteusDS Simulation Toolbox following the ideas we covered in the article. Click on the thumbnail to view the video on YouTube.